Accretech Roundness and Cylindrical Profile Measuring Instruments (RONDCOM43C/43C-S/41C/31C Series)
Category: Roundness MachineRoundness Machine
Specifications
Details
Features
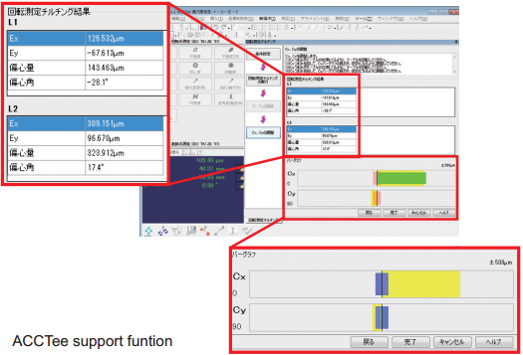
Centering/Tilting/Leveling Support Functions (Patented)
Easily adjust eccentricity and tilt between the center of rotation and the center of the workpiece simply by adjusting the displacement to zero as indicated on the bar graph in the alignment display.

Semi-Automatic Measuring Function with Specification of Measuring Height
All Orientation Detector (Optional) May Be Provided
The detector expands the measuring range to ±1000µm and enbles measuring force and front travel (stylus drop) adjustment.
R-axis Scale for Small, High-Accuracy Workpieces (R43C-S)
R41C Supports High Column: Z = 500 mm (Option)
Full Specifications
| Model | RONDCOM Series | |||||
| RONDCOM 43C-S | RONDCOM 43C | RONDCOM 41C | RONDCOM 31C | |||
| Measuring System | Manual | |||||
| Measuring range | Max. measuring diameter | Φ200mm | Φ250mm | |||
| Right/left feed range (R-axis) | 100mm | 125mm | ||||
| Up/down feed range (Z-axis) | Standard | 300mm | 200mm | |||
| High Column | – | 500mm | – | |||
| Max. loading diameter | Φ400mm | |||||
| Max. measuring height (OD/ID* measurement) | Standard | 300mm | 200mm | |||
| High Column | – | 500mm | – | |||
| Rotation accuracy | Radial direction JIS B 7451-1997 | (0.02 + 6H/10,000)μm | (0.04 + 6H/10,000)μm | |||
| (H: Height from table top to measuring point mm) | ||||||
| Straightness accuracy | Up/down direction (Z-axis) | Standard | 0.25μm/100mm | 0.5μm/100mm | – | |
| 0.8μm/300mm | 1.5μm/300mm | |||||
| High Column | – | 0.5μm/100mm | – | |||
| 2.5μm/490mm | ||||||
| Radial direction (R-axis) | 0.2μm/10mm | – | ||||
| Parallelism accuracy | Up/down direction (Z-axis) | Standard | 1.5μm/300mm | 3μm/300mm | – | |
| High Column | – | 1μm/100mm | – | |||
| Radial direction (R-axis) | (0.3 + 0.1L/10)μm | – | ||||
| Rotational speed (θ-axis) | 6/min | |||||
| Up/down speed (Z-axis) | 0.6, 1.5, 3, 6 mm/s (Max 15mm/s) (At moving: 15mm/s max.) | 5mm/s | ||||
| Radial direction speed (R-axis) | 0.6, 1.5, 3, 6 mm/s | 5mm/s | ||||
| Auto stop accuracy | Z-axis/R-axis | ±5μm | ||||
| Rotary table | Table outside diameter | Φ148mm | ||||
| Adjustment range of centering/tilting | ±2mm/±1° | |||||
| Load | 15kg | 25kg | ||||
| Detector | Detection range, Measuring force | ±400μm/70mN | ||||
| Stylus shape | Φ1.6mm carbide ball | |||||
| Stylus length | L54.5 mm | L15.5 mm | ||||
| Type of filter | Digital filter | Gaussian/2RC/Spline/Robust (Spline) | ||||
| Cutoff value | Rotational direction (θ-axis | Low pass | 15, 50, 150, 500 peaks/rotation, settable any value in range 15 to 500 peaks/rotation | |||
| Band pass | 1 to 500 peaks/rotation | |||||
| Rectilinear direction (Z-axis) | Low pass | 0.025, 0.08, 0.25, 0.8, 2.5, 8 mm (any value in 0.0001 mm units) | – | |||
| Measurement magnification | 50 to 100 k | |||||
| Roundness evaluation of form error | MZC (min. zone circle method) | |||||
| LSC (least square circle method) | ||||||
| MIC (max. inscribed circle method) | ||||||
| MCC (min. circumscribed circle method) | ||||||
| N.C. (no compensation) | ||||||
| MULTI (multiple setting) | ||||||
| Measuring items | Rotational direction | Roundness, Flatness, Parallelism, Concentricity, Coaxiality, Squareness, Thickness Variation, Run-out | ||||
| Cylindricity, Diameter deviation | – | |||||
| Rectilinear direction | Straightness (Z), Taper ratio, Cylindricity, Squareness, Parallelism | – | ||||
| Analysis processing functions | Centering/tilting support function, Notch function (level, angle, cursor), Combination of roundness evaluation methods, Nominal value collation, Cylinder 3D profile display (line drawing, shading, contour line), Real-time display, Profile characteristic graph display (bearing area curve, amplitude distribution function, power spectrum), Semiautomatic measuring function | |||||
| Display (color monitor) | 17″ LCD | |||||
| Display items | Measuring conditions | |||||
| Measuring parameters | ||||||
| Comments | ||||||
| Printer output conditions | ||||||
| Profile graphics (expansion plan, 3D plan) | ||||||
| Error messages, etc. | ||||||
| Recording system | Color or laser printer can be selected | |||||
| Other | Power supply (Voltage to be specified), frequency | AC100 to 120 V ±10%, AC220 to 240 V ±10%, 50/60 Hz (grounding required) | ||||
| Power consumption | 600 VA (except printer) | |||||
| Air supply | Supply pressure: 0.35 to 0.7 MPa, Working pressure: 0.3 MPa | |||||
| Air consumption volume | 30NL/min | |||||
| Installation dimensions (W x D x H) mm | Standard | 1800 x 1000 x 1800 | 1800 x 1000 x 1700 | 1800 x 1000 x 1700 | ||
| High Column | – | 1800 x 1000 x 1900 | – | |||
| Weight (except options) | Standard | 130 kg | 120 kg | |||
| High Column | – | 140 kg | – | |||
Options
- Desktop anti-vibration table: E-VS-S57B
- Bench for desktop anti-vibration table: E-VS-S13A
- System rack: E-DK-S24A
View more about Accretech Roundness and Cylindrical Profile Measuring Instruments (RONDCOM43C/43C-S/41C/31C Series) on main site

